
Often while editing photos, or doing other work in full screen mode on my mac, I found that I wanted to have a second screen, to watch youtube, or show an app like spotify or itunes. There are small, low-res HDMI screens available on eBay, often intended for Raspberry Pi’s or for DSLR, but I wanted something a little better to go alongside my Retina 5k iMac. Unfortunately for me, not even Apple themselves offers a retina display for sale. You can actually use a Retina iPad as an external display, over USB, thanks to Air Display, but this option uses a bit of CPU power to encode a high-quality H.264 video of the screen, and stream this over the USB cable.
More recently, many laptops and portable devices have started using eDP, or embedded DisplayPort. Here, the signal to the LCD panel is no longer LVDS, but an actual DisplayPort signal, with a small driver chip on the LCD itself doing the translation for the screen. As a result, some more talented people than I, have started to produce adapter boards to allow these eDP panels to be used with a normal computer. There is no translation for the DisplayPort signal (but even just routing high speed signals on a board is not so easy…), the challenge is that the backlight power requirements and the connectors for LCD panels differ widely, so most of these adapters are designed to be used with one screen and one screen only. This means that each display needs to be worth the effort to make a custom eDP adapter for, and as a result, most of the adapters available are for the beautiful Apple Retina displays on the iPad and Macbook Pro’s.
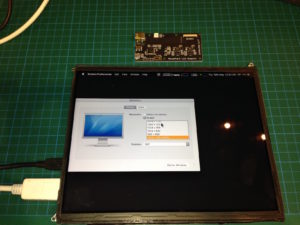
A long story short… I’ve got my solution, using an iPad 4 screen, and the adapter board from AbuseMark. Works great!
Now to design a case and mouting system… See part 2!
The only real challenge was getting the HiDPI mode to work. There’s some good info from people using the Adafruit Qualia over here and here, but the key missing info I needed was that the location of the overrides folder changed in El Capitain – foiled by Apple yet again! The new location is /System/Library/Displays/Contents/Resources/Overrides/<insert folder for display here>.
If I was to do this all over again, I’d probably try for a solution using the Chromebook Pixel – its a cheap screen in a perfect size.
Curious about how I made an iPad LCD enclosure? See part 2 for the design!
For reference: eDP to Displayport Adapter Vendors (mostly for iPad or Macbook Retina Displays)
- AbuseMark
- Adafruit Qualia
- Latent Laboratories: Chromebook Pixel
- Rozsnyo: iPad, MacBook Pro
- Mikesmods: Macbook Pro
- And even more on eBay, taobao and aliexpress…